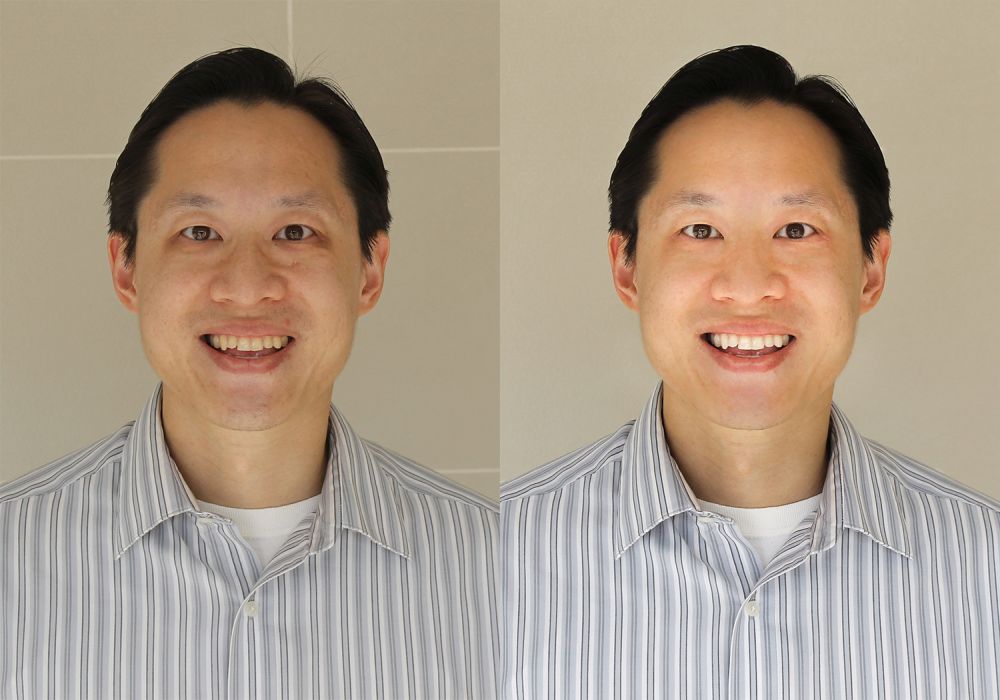
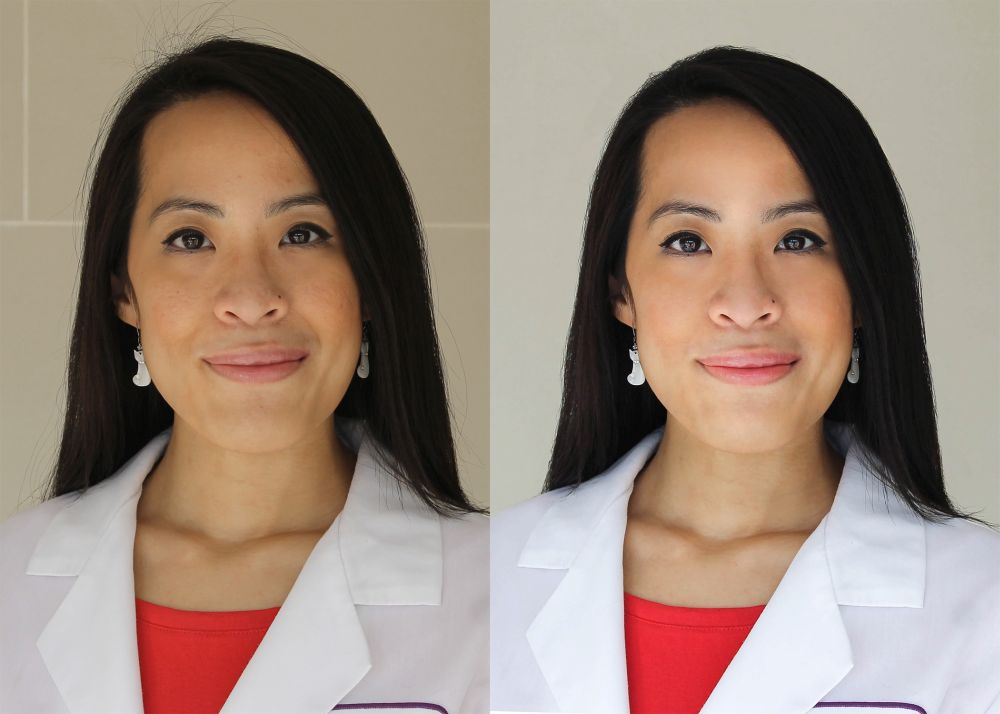
For our passport-style photos, we usually take our own using our DSLR and then enhance with Photoshop. As we both need new official portraits for paperwork this week, we decided to try out Lightroom.
Lightroom is a graphics design software and companion to Photoshop in the Adobe suite. While they’re both used for post-processing, Photoshop has a wider range of tools and capabilities; however, Lightroom is more than enough for the photo editing that we require for our personal purposes. Supposedly, it’s also easier to learn and easier to use. Another great thing is that Lightroom is nondestructive and historical changes are automatically retained within the file itself, without the need for separate layers or multiple files (saving the .psd and image separately).
We are mere amateurs at photography and post-processing using Photoshop, and complete novices at Lightroom, but we wanted to share our first attempt at Lightroom with you.
Obviously we do not have professional backdrops, softboxes, reflectors, or lights, but we do know the importance of getting the best raw image possible even in the limited time and resources we had. We found a neutral background with natural lighting that fell evenly.
Despite our efforts, you can see that the white balance is not perfect and that the overall look is dull. The light approaches our faces from below and therefore falls more on our lower than upper faces. It begins to fall even less uniformly between the time we took Kathy’s and the time we took Silas’ picture. Of course, there’s the fact that we look tired and have blemishes – imperfections that we don’t want recorded in our permanent record. Here are the before and after images:


A full chronicle of our edits would be too extensive; furthermore, photo editing depends in huge part on personal tastes. Here is a summary of the changes that we made.
- Import and virtual copy: Lightroom is known for efficiently managing large numbers of images and even allows batch processing. Please remember to make a virtual copy in case you want to experiment with different edit strategies simultaneously.
- White balance and histogram: Adjusted to account for the color and temperature of the ambient lighting, as we did not shoot in a professional studio setting.
- Sharpen faces preset: Honestly, the actions of this tool were relatively unnoticeable… but maybe that’s a good thing as we want to look natural. As a preset, we suppose it did what it was supposed to do!
- Rotation: Using the manual lens correction, we ensured our pupils were horizontally leveled. This tool would also be helpful to level the horizon in scene photography.
- Radial filter: An excellent tool that allows you to select an area to be edited. We drew a circumference around the top halves of our faces to counter the direction of natural light.
- Spot remover: A must-have tool for portrait photography to eliminate unwanted backdrop features and those temporary zits, while not losing features natural to ourselves, like birthmarks. This is similar to the clone stamp of Photoshop except Lightroom automatically decides the area that will be cloned (that can be manually adjusted). Also, the spot remover can be drawn in a shape and not just a spot.
- Adjustment brush: For these particular images, this is the tool we used most frequently. We used to remove dark circles, lighten sclerae, whiten teeth, soften skin, sharpen features, and adjust highlights and shadows on our faces.
Our experiences demonstrate that Lightroom is indeed an effective and easy-to-use tool, even for less than ideal raw images and complete beginners who do not realize its full functionality. In full disclosure, we did use Photoshop for the final step when we cropped and made mosaic 2×2 head shots for printing a 4×6 photograph.
If you are familiar with Lightroom, we’d love to hear your tips on what we could have done differently and what we could have done additionally to make our pictures better! We always want to learn more. Leave a comment below.
Happy processing!
– Silas and Kathy May

